Hey guys! I have had a blast playing with my goodies for this month! I am especially excited to share with you the card I made. Not because of the card, but because of the envelope I made. I totally made my own pattern from an old worn out envelope I had. I had never done that before so I thought I'd give it a try. It was actually pretty easy too! I used the
Daisy Bucket Playlist papers for this. They worked great!
Here are my instructions:
#1 -- Carefully take your envelope apart so that you don't rip it. Don't worry if you have a few "little" rips. You just want to make sure that you can still trace it to make your pattern.

#2 -- Trace each section of the envelope you took apart. I traced the main section 1st and included the top and bottom flaps. Mark where the flaps fold.
#3 -- Then, I traced one side. Leave a little extra -- about 1/4" on the side that will attach to the main section. You can use this piece for both sides by simply flipping it to fit the appropriate side of the main section.
When I was finished tracing everything, I had two pattern pieces.

#4 -- Trace the main pattern piece onto the paper you want to use. Cut it out. Fold the top flap and bottom flap where you have them marked.
#5 -- Trace the side piece. Make sure to flip the pattern over when you trace the opposite side. Cut it out. On the side that will attach to the main section fold about 1/4" of the paper so you can attach it.
#6 -- Attach the folded sides of the side sections to the main section.
#7-- Then, run a line of adhesive along the edge of a side section so that the other side section will connect to it in the middle.
#8 -- Use adhesive to attach the bottom flap to the adhered side sections.
#9 -- Once you finish your card and place it in the envelope, you can adhere the top down!
Card instructions:
#1 -- Cut your cardstock to the size that will fit your envelope. Then score it where you want your fold to be.
#2 -- Cut a piece of patterned paper that will fit both sides of the card. Using the paper with circles, cut around the circles to create an edge that will show up on the background paper.
#3 -- Add your sentiment.
#4 -- Doodle around the edges and add chipboard button.
#5 -- Stick it in the envelope and mail it off!
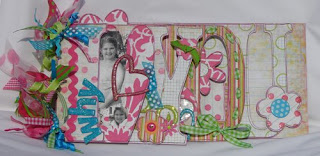
I also made a layout using this paper. It is really quite versatile and the colors work well with a lot of my pictures. This layout is about my oldest daughter and her love of the Fightin' Texas Aggies! (Sorry Becky! I know you are a Tech girlie!)


That album is just gorgeous!!! You did an awesome job with everything, Brandy!! I love the step-by-step instructions!! Great post!!
ReplyDelete