
Saturday, October 31, 2009
LOTW 10/31
I LOVED this layout the first time I saw it...I just love it all..the picture is super sweet...the colors are fantastic and the little bit of bling sure makes it pop!! Congrats Destinae for being Layout of the Week!!

Jenn
Friday, October 30, 2009
Freaky Friday!!

For this weeks Freaky Friday Challenge I want you all to dig deep into that stash of pictures. I mean....REALLY deep!! I want you to scrap a layout about YOU on Halloween!! It could be from when you were a child or even a past Halloween in 'witch' you dressed up!! So go through those pictures...dust them off and scrap that layout!! Here is one I did of myself...I am guessing it was about 1984 or 1985....I was so excited to be a punk rocker...Madonna and Cindi Lauper were all the rage. :) I wore my mom's shirt and she tied a silk scarf around my waist and I got to wear makeup for the very first time. Needless to say...I thought I was WAY cool!! :) Can't wait to see YOUR pictures!! :)

supplies include:
3 Bugs Simple Pleasures paper
Simple Pleasures cardstock pack
3 Bugs Simple Pleasures Die Cuts
thickers Chestnut
KI Memories letters
tickets from boysmamaxtwo.etsy
Ranger Distress Walnut Stain
brown sharpie
Wednesday, October 28, 2009
A little October Afternoon Report Card!!
Hey there...Jenn here!! Well tomorrow is Parent/Teacher conferences for me...I have a 2nd and a 4th grader!! They are both really bright...for that I'm so thankful and blessed!! I love getting report cards....the anticipation to see those great marks and atta boys' from the teachers!! So I felt it was only natural for this time of year to use the wonderful papers from the October Afternoon Report Card collection!! I also used the Journaling Cards and Shape Stickers for these projects!! Hope you enjoy!!
I won't post the first layout I did...as it was just posted here on Sunday!! :) But...I did this simple layout detailing the letter that Mathew received from Lego Magazine after submitting a photo of his creation! I was so impressed that they actually do that for all the kids....what a way to make them feel super important!! Notice the stitching on the side!! :)

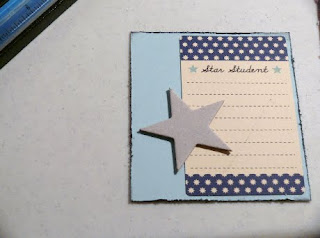
And since it is Parent Teachers...I always try to give the teacher a little gift. :) I made Auston's teacher a little set of notecards that I thought would be perfect for her to hand out to students on their stellar days!!

And another gift for his teacher....but I think it would be the funnest make and take and am already planning it for my next crop. Super easy too!! Just grab an old cardboard box (I used the inside of a priority mailing box!!)...and rip it so a little bit of the corrugation shows up!! Next just scrap a mini sized layout on top of the cardboard...although I think it would be fun to put a little paint on it as well!! Punch a couple holes on the top...tie with a pretty ribbon and voila!! Easy peasy. I think the girls at my crop will love this little project...and it can be used for anything!! :) I would love to see what you create...so make sure to post a link here in the comment section so I can take a peek!! :) Have a fantastic week!!

Tuesday, October 27, 2009
Member Spotlight-Kristi Lockart

1. Tell us a little about yourself and your family.
My sweetie and I have been married for 25 years and we live in the Gallatin Valley in beautiful Southwestern Montana. Yellowstone National Park is about an hour and a half away and we love taking road trips to see all the wildlife and beauty in the Park. We have three amazing children. Bethany, our oldest, and Matt have been married for three years. They live in the Seattle area and they have a cute little Yorktese puppy named Lola. Heidi lives close to home and attends Montana State University and is majoring in Nutrition. Benjamin still lives at home, well at least for the next seven months. He is a senior at our local high school, is enlisted in the National Guard, and he loves soccer and skiing. I work in our local high school library and I have been a consultant for AC Bailey since March of this year.
2. How and when did you start scrap booking?
I have always been crafting in one form or another. I started paper crafting with a friend of mine who sold Stampin Up products. I made cards exclusively as I figured that scrapbooking would end up costing me more than I wanted to spend. When my oldest was nearing graduation, I thought it would be fun to make an album of her high school years. I researched online and found so many products and ideas, I was hooked!!!! (BTW, I was right, I do spend way more than I should!!!)
3. How would you describe your scrap booking style?
Eclectic-I lean towards shabby chic, but my style changes according to my mood and the individual pages that I create. Each page takes on a life of its own and I pour my heart and soul into every layout I make. I also have to add that I have really become an everyday moments scrapper. I use my scrapbooking time as a form of therapy. Rather than put my thoughts in writing-I just scrap it!
4. How often do you journal? Is it important to you?
I don't journal as much as I would like to. I don't like my handwriting, but since my mom's passing I have realized how important it is to leave handwritten thoughts behind.
5. Do you have a dedicated scrap space ( room )?
Yes I do and I love it!!! My sweet husband has spent lots of time and effort into making a wonderful place for me to scrap and to invite my friends to join in the fun!!! I am a very lucky woman!!! My scrapspace takes up a great part of our family room, but when the family is dowstairs watching tv, I can work and be close by them!!
What does it look like right now?

6. What are your "go to " tools or supplies when you scrap?
My Cricut- My Cricut is an invaluable tool in sooooo many ways, from alphas to chipboard embellishments and everything in between!!! I just love that machine!!!
Punches-I love adding a punched border or embellishment to my projects. They can really dress up a page!!!
My Scissors- I love to cut embellishments out of patterned paper and I also love to distress edges with my scissors. I have to have a sharp pair handy at all times!!
7. Where do you start when you get ready to create- sketches, supplies, photos...?
It just depends. I am a "fly by the seat of my pants scrapper". I guess you could say I usually start with a theme and the rest just falls into place.
A little of both. The creative outlet of scrapbooking is very theraputic for me and I just love working with all mediums associated with scrapping. I also love the thought of leaving treasures in the form of scrapbook pages for my family behind when I am long gone from this earth. They appreciate them now, and I know they will treasure them even more in the future!


Technique Tuesday
Another fabulous morning ladies...Jenn here!! Well....I thought long and hard about this one. I mean...how many techniques do I really know/do?? I'm kinda a boring gal..doing the same stuff over and over again. But lately...my signature seems to be stitching as I stitch on everything it seems!! And while I know it's nothing fancy...I decided that will be my technique...lazy Jenn style. So here it goes!!
The first thing I do is pick my shape or what I want to stitch. For this project I chose a star...so I just found a chipboard star shape that I had in my stash...and then traced around it. Normally I like to just stitch a straight line...and I REALLY love to stitch circles!!


And just for fun...here is a layout I just recently did...where I stitched to look like a baseball! Can't wait to see you all try it!!

The first thing I do is pick my shape or what I want to stitch. For this project I chose a star...so I just found a chipboard star shape that I had in my stash...and then traced around it. Normally I like to just stitch a straight line...and I REALLY love to stitch circles!!

After tracing I just take my poker (paper piercer) and poke holes through the paper using the line I traced. I don't make them a certain spacing...just eyeball it. (see...that's where the lazy comes out in the lazy Jenn style!!).

Then I begin stitching. I just use a regular needle and regular ol' embroidery thread! (all strands) When I stitch I generally just stitch straight...so that there will be a skip between the stitches (if that makes sense??) Then when I get to the beginning/end then I go backwards and cover the remaining spaces. I make a simple knot on the back to tie it off and voila! All done!!


And just for fun...here is a layout I just recently did...where I stitched to look like a baseball! Can't wait to see you all try it!!

Sunday, October 25, 2009
Product of the Week 10/25
Soooo.....the product of the week was something that I thought for sure I had given up and moved past. You may remember those days with the same cringes as the 80's...BUT...they've come a long way baby! STICKERS!! Yup...I'm a total sticker lover now...I think they are the perfect little accent for a layout or card....I'm especially diggin' them for cards lately!! So take a peek at the store and shop for some new stickers of your own!
Check out this layout I just finished using the new October Afternoon Recess stickers!!

Cute huh?? Well...I think so!!
*tee hee*
Jenn
Use coupon code OCT25 to get your discount (thickers not included)
Check out this layout I just finished using the new October Afternoon Recess stickers!!

Cute huh?? Well...I think so!!
*tee hee*
Jenn
Use coupon code OCT25 to get your discount (thickers not included)
Saturday, October 24, 2009
Layout of the Week 10/26
Oh my, I agonized over this one all night!!! There are so many amazing projects in the gallery this week!!! How do you choose just one? Well, after much thought and deliberation I chose this layout by Chrisnm - loved what she did here! Congratulations Christina!

Kristii

Friday, October 23, 2009
Freaky Friday 10/23/09

This week's Freaky Friday Challenge is Easy Peasy!!!!
Create a layout using fall colors (brown, green, orange, yellow) or use Basic Grey Indian Summer papers. Also include, some leaves and/or a pumpkin-could be die cuts, stamps...
Here's my example:
Here's my example:
You will have until next Friday to post your layout in the gallery and link it to the Freaky Friday Thread.

Have fun girls!!!
Kristii
Wednesday, October 21, 2009
Indian Summer Anyone?
 I don't know what the weather has been like where you live, but we have had a little bit of everything here in Montana this fall!!! From extreme heat to extreme cold, the leaves didn't stand a chance. Thank goodness for Basic Grey's Indian Summer Line!!! These beautiful papers bring back the rich fall colors that we so rudely missed this season! The colors in these papers are truly amazing!! From deep browns, reds and rich oranges to subtle and vivid pinks, the colors and patterns shout fall!! The embellishments in this line are absolutely wonderful too!! For card, I used the Autumn Memories Tag from the Basic Grey Indian Summer Elements Stickers sheet. I also used a cute little felt tree from the Indian Summer Woolies package. The Bazzill cardstock came in a wonderful package of four pefectly matched colors put together just for the Indian Summer line. I used the threading water punch to add a cute little textured border and some ribbon from my stash. The rub-ons used on this card came from the cute little Sizzix Texture Boutique Embossing System beginner's kit. The kit contains the machine, embossing folders, cardstock, and envelopes, and rub-ons to make cards and projects galore. I just love the fact that
 I can create embossed designs on any color and style of cardstock I
choose. The following two cards were made using this sweet
little machine's swiss dot folder. I embossed some white
cardstock, which was a breeze, then I cute the embossed
papers down to the desired size. How easy is that?

In this simple little Thank You card, I used a border sticker and a round sticker from Basic Grey's Indian Summer Elements Sticker sheet. I matted the circle on a punched scallop circle and added the bird and little leaf circle to complete the ensemble. A typed greeting, Kaiser Craft Pearls, ribbon, and some thin twine completed the embellishment ensemble.

The final card was made with three punched borders, a Basic Grey Woolies embellishment and a Basic Grey Indian Summer Harvest Moon Rub-on and some ribbon.. Very simple, yet very elegant!
I want to thank you for taking the time to stop by the AC Bailey Blog!!!
I hope you have a wonderful day!!!
Kristii
Tuesday, October 20, 2009
Technique Tuesday 10/20/2009
Basic Grey Shaped Card

Materials from AC Bailey:
Basic Grey Indian Summer Paper Pack
Basic Grey Take Note Journaling Cards with transparencies
Basic Grey Indian Summer Woolies
Bazzill Paper Pack – Indian Summer
Flora Doodles Paper Florettes – For the Guy
Kaiser Craft Bling
Maya Road Chipboard Letters – Noah
Tim Holtz Distress Ink – Worn Lipstick
Stickles – Fruit Punch
From my stash:
Ribbon
I started with Basic Grey Take Note Journaling Cards with transparencies for the shape of the card. I folded a piece of 6 x 12 cardstock in half and placed the fold to the left.
I traced the journaling card onto the cardstock.
I cut around the card leaving the fold intact.
Then I cut the brown edge off of the journaling card, so that, when I glue the journaling card to my cardstock base, I will have a nice red edge around my card. I traced the inside of the brown border on a piece of white cardstock to use as the inside of my card.

I glued the Journaling Card and Transparency to the front of the card and I added some Flora Doodles, Woolies, and ribbon embellishments.
I inked The Maya Road Chipboard Alphas with Worn Lipstick and then added Fruit Punch Stickles to create the glittered alphas.

I cut out the white card insert and glued to the inside of the card and added a Flora Doodle. (Note: the Flora Doodles gem is green in color, so I carefully removed the green gem and added a clear gem for color matching purposes.)


Materials from AC Bailey:
Basic Grey Indian Summer Paper Pack
Basic Grey Take Note Journaling Cards with transparencies
Basic Grey Indian Summer Woolies
Bazzill Paper Pack – Indian Summer
Flora Doodles Paper Florettes – For the Guy
Kaiser Craft Bling
Maya Road Chipboard Letters – Noah
Tim Holtz Distress Ink – Worn Lipstick
Stickles – Fruit Punch
From my stash:
Ribbon
I started with Basic Grey Take Note Journaling Cards with transparencies for the shape of the card. I folded a piece of 6 x 12 cardstock in half and placed the fold to the left.
I traced the journaling card onto the cardstock.
I cut around the card leaving the fold intact.
Then I cut the brown edge off of the journaling card, so that, when I glue the journaling card to my cardstock base, I will have a nice red edge around my card. I traced the inside of the brown border on a piece of white cardstock to use as the inside of my card.
I cut around the card leaving the fold intact.
Then I cut the brown edge off of the journaling card, so that, when I glue the journaling card to my cardstock base, I will have a nice red edge around my card. I traced the inside of the brown border on a piece of white cardstock to use as the inside of my card.

I inked The Maya Road Chipboard Alphas with Worn Lipstick and then added Fruit Punch Stickles to create the glittered alphas.

I cut out the white card insert and glued to the inside of the card and added a Flora Doodle. (Note: the Flora Doodles gem is green in color, so I carefully removed the green gem and added a clear gem for color matching purposes.)

I hope you have fun making this little shaped card!!!
Enjoy!
Kristii
Kristii
Saturday, October 17, 2009
Layout of the Week 10/17/2009
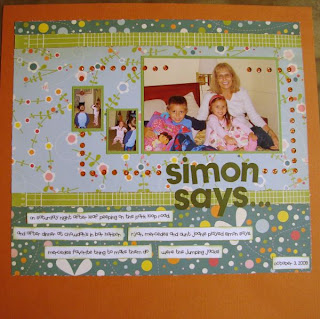
Congratulations to Rhonda for her "Simon Says" layout
Although this layout was for the Freaky Friday Challenge to use a punch, Rhonda punched holes with her Crop-A-Dile to make a frame and filled the holes with Stickles....we all thought they were rhinestones!!! That's Yankee ingenuity at it's best!
Way to Go!!
Although this layout was for the Freaky Friday Challenge to use a punch, Rhonda punched holes with her Crop-A-Dile to make a frame and filled the holes with Stickles....we all thought they were rhinestones!!! That's Yankee ingenuity at it's best!

Wednesday, October 14, 2009
Technique Tuesday 10/13/2009
I love buttons – I love the look of them in little jars separated by color – I love spilling them out to select the perfect one for the center of my flower or to use as an accent on my pages. I love using twine to tie through the holes instead of using embroidery floss, and I have seen buttons tied with ribbon and raffia, like the one Audrea did here.

I love filling the holes with Stickles or Dimensional Pearls. The last few weeks though, I have seen buttons used in some of the most unique ways.

Buttons can be used to make a snowman by stacking one on top of the other like this.
 Scalloped edges have become very popular in scrapbooking and card making – but did you ever think about making a scalloped edge with a row of buttons like Amy did here:
I always turn to buttons for the center of flowers, but did you ever make a flower or tree from buttons? Yvette did a fabulous job on these two cards where she made a topiary on one card and made little trees out of buttons on another.


 I am thinking that buttons could be made into Lollipops, or used to replace wheels on a Bus, Bike, Car, Baby Stroller.
Buttons can be used for bullets to accent journaling or in place of brads to accent a curve or a corner. They make fantastic photo frames too!
There are lots of ways to decorate buttons. They can be inked with Staz-On, accented with Stickles or Dimensional Pearls, and can be decorated with a rub-on like this one.

Buttons can be decorated with a Sharpie, Slick Writer, or Signo Pen.
Crackle Paint will not stick to a glossy button, but it will stick nicely to a cloth button.
Buttons can also be accented with brads like shown here and here .


I really hope that this has given you some new ideas about buttons – or maybe serves a reminder to use buttons on your layouts and cards more often. Whatever it may be – can’t wait to see!
Dee

I love filling the holes with Stickles or Dimensional Pearls. The last few weeks though, I have seen buttons used in some of the most unique ways.

Buttons can be used to make a snowman by stacking one on top of the other like this.
 Scalloped edges have become very popular in scrapbooking and card making – but did you ever think about making a scalloped edge with a row of buttons like Amy did here:
I always turn to buttons for the center of flowers, but did you ever make a flower or tree from buttons? Yvette did a fabulous job on these two cards where she made a topiary on one card and made little trees out of buttons on another.


 I am thinking that buttons could be made into Lollipops, or used to replace wheels on a Bus, Bike, Car, Baby Stroller.
Buttons can be used for bullets to accent journaling or in place of brads to accent a curve or a corner. They make fantastic photo frames too!
There are lots of ways to decorate buttons. They can be inked with Staz-On, accented with Stickles or Dimensional Pearls, and can be decorated with a rub-on like this one.

Buttons can be decorated with a Sharpie, Slick Writer, or Signo Pen.
Crackle Paint will not stick to a glossy button, but it will stick nicely to a cloth button.
Buttons can also be accented with brads like shown here and here .


Dee
The Last Sip of Lemonade
Good bye summer....just looking at these layouts now, while the leaves are changing colors and the days are getting shorter make me a bit sad. When I was choosing my Design Team supplies it was hot and humid August...little did I think the the day I would be posting the layouts done with them would be six week later and we would be into full blown Autumn. I loved layering these Basic Grey Lemonade papers. The colors are so vibrant and look fabulous together.Basic Grey has started to produce felt embellishments to coordiante with their paper lines. They are called "Woolies" Check out the little lady bug!

.jpg) This first layout is of my daughter Dana when she was competing in a Triathlon. I was pretty lucky that her racing gear coordinated so nicely with the colors in these papers! The second layout is of my "adopted daughter", (she adopted me when she was in college with my daughter Cara - and I adopted her right back!) Alison and her daughter Payton. Another pretty bunch of papers layered on each other...again, I was very lucky that Alison's bathing suit coordinated perfectly with the papers! I am keeping this layout but I made Alison an altered picture frame with my scraps and used this lovely picture of them together. I love making altered frames. I guess I will say goodbye to summer with these and get ready for Autumn. Until next time, Happy Scrappin'! Dee
This first layout is of my daughter Dana when she was competing in a Triathlon. I was pretty lucky that her racing gear coordinated so nicely with the colors in these papers! The second layout is of my "adopted daughter", (she adopted me when she was in college with my daughter Cara - and I adopted her right back!) Alison and her daughter Payton. Another pretty bunch of papers layered on each other...again, I was very lucky that Alison's bathing suit coordinated perfectly with the papers! I am keeping this layout but I made Alison an altered picture frame with my scraps and used this lovely picture of them together. I love making altered frames. I guess I will say goodbye to summer with these and get ready for Autumn. Until next time, Happy Scrappin'! Dee
Friday, October 9, 2009
Freaky Friday Challenge 10/9/2009
It's that time again!!
A new Freaky Friday layout challenge!!!
This week is "easy" -
this week's challenge is to use your punches and create the background to a layout.
You can do this in a number of ways - several ideas come to mind.
I am gonna work on something for this after dinner tonight.
Okay- got some questions, so I will try and clarify.
I used two sided cardstock. I cut it the size of the card, I punched the flower image in a border type pattern and when the card is closed you see the solid underneath show through creating the look. I personally like this card cause I can use it horizontal or vertical. This is plain, but I add a stamp or matted sentiment to it. You can decorate with buttons and stuff. I opened the card to show the back of the cover, so you see the punched spaces clearer.
Get it now??
You could easily punch a design into one sheet and lay it over another for the same effect on a layout- play with your punches a bit and see what you come up with.


A new Freaky Friday layout challenge!!!
This week is "easy" -
this week's challenge is to use your punches and create the background to a layout.
You can do this in a number of ways - several ideas come to mind.
I am gonna work on something for this after dinner tonight.
Okay- got some questions, so I will try and clarify.
- You are being asked to use the punches to create a background to your layout.
- You can use any punch. You can punch stuff and glue it on in some pattern.
- You can use a punched sheet like a template.
- You can make an overlay...be creative.
I used two sided cardstock. I cut it the size of the card, I punched the flower image in a border type pattern and when the card is closed you see the solid underneath show through creating the look. I personally like this card cause I can use it horizontal or vertical. This is plain, but I add a stamp or matted sentiment to it. You can decorate with buttons and stuff. I opened the card to show the back of the cover, so you see the punched spaces clearer.
Get it now??
You could easily punch a design into one sheet and lay it over another for the same effect on a layout- play with your punches a bit and see what you come up with.


Wednesday, October 7, 2009
World Cardmaking Day!!
What a fun time!! Our Gallery is chock full of awesome cards and I am happy to announce the winners. We picked a winner for each individual challenge and the Grand Prize Winner was selected using random.org. There were 211 entries!!!
So everyone who walked away with some beautiful cards was a winner in my book..... but Congratulations to the following......
challenge #1 (khamann) (Karen)
challenge #2 Glitzychick (Yvette)
challenge #3 Chrisnm (Christina)
challenge #4 IndianaSugar1979 (Dana)
challenge #5 MntMommyScrapper (Jessica)
challenge #6 Zenita
challenge #7 Kelly in IN
challenge #8 Sunnydayscrapper (Ginnifer)
challenge #9 Sasha728 (stephanie)
The Most Cards - 26 - prize goes to (Scrapchickee) Brandy
Grand Prize winner selected through random.org was Amy (rechkea)

Kellyin IN did a beautiful card using the smash technique that was posted in the forum. She used alcohol inks and the colors blending together are just lovely.Check out our foum for the tutorial which can be found in Technique Tuesday.
There are many great ideas and fun techniques to try just to push you out of your "Comfort Zone" and the results are amazing! I also loved seeing the card that Jessica did for the border challenge. I love the bright colors along with the stitching and tied ribbon

Since it is already snowed in some places in the country I thought it would be fun to leave you with a card done by DanaT for the Emboss and Button challenge. Her little snoman is so cute with that swirled embossing and the little button hat is just perfect.

So everyone who walked away with some beautiful cards was a winner in my book..... but Congratulations to the following......
challenge #1 (khamann) (Karen)
challenge #2 Glitzychick (Yvette)
challenge #3 Chrisnm (Christina)
challenge #4 IndianaSugar1979 (Dana)
challenge #5 MntMommyScrapper (Jessica)
challenge #6 Zenita
challenge #7 Kelly in IN
challenge #8 Sunnydayscrapper (Ginnifer)
challenge #9 Sasha728 (stephanie)
The Most Cards - 26 - prize goes to (Scrapchickee) Brandy
Grand Prize winner selected through random.org was Amy (rechkea)

There are many great ideas and fun techniques to try just to push you out of your "Comfort Zone" and the results are amazing! I also loved seeing the card that Jessica did for the border challenge. I love the bright colors along with the stitching and tied ribbon


Tuesday, October 6, 2009
Technique Tuesday 10/6/2009
As you all know, I live in New England, I am definitely a Yankee.
I have Yankee ingenuity and Yankee pride, and I am Yankee shrewd.
After all, I hang my clothes out to dry, we heat with wood cut and cleared off our land, and since it is fall -I scrap with stamps made of LEAVES!

Yes, you heard me right- I use leaves, REAL LEAVES, when scrapping, why not? look at our trees (pic 1) the ground is covered with them- may as well put them to good use. Dee found this website "Trish B Design Studio" and it showed how to do "leaf printing" - that Trish Bayley must be a New Englander too (hahaha) and I decided to give it a try- I was not feeling too optimistic when I first started out, but I love how it turned out ad will definitely be doing more of this.
First you gather your supplies, (pic 2) you will need leaves, paper, pigment ink, an acrylic stamp block, and paper towels.
Then you ink the leaves. I place the leaf on top of the ink pad and push down. You could also place your leaf on scrap paper and turn the ink pad over and ink the leaf that way too. Carefully pick up your leaf and place it on your paper where you want the image to be. Quickly place the acrylic block over the leaf and push it flat to gain all the leaf detail on your paper. (pic 3) Do not rock or the image will distort. Carefully remove the block and leaf and TADA!! You have a leaf print image!
Repeat this process to fill your paper as you'd like. Use different leaves and different color inks. (pic 4) They do not even have to be earth-toned.
And, each leaf is different and each SIDE of each leaf is different, so if you are not happy with the image stamped, turn the leaf over and try the other side.
When the paper is dry, you can use it however you want. I cut mine and created this great fall card (pics 5 and 6) and I had pieces leftover.
The pics get cropped when doing the collage thing, so here is a pic of it all by itself too.

Give it try! Post your leaf creations here by noon on Friday- I will draw a name from a hat and send someone a RAK for trying! I am still giving away stuff! That is so much fun too-
Gail
Saturday, October 3, 2009
Layout of the Week 10/3

Friday, October 2, 2009
Enter to win a chance to be a featured Blog during our AC Bailey Blog Hop in November!
The design team has come up with a little blog challenge for you. Sign up by October 7th for the challenge in which you have a chance to win a prize along with the opportunity to be included in a unique AC Bailey blog hop, giving your blog additional exposure and visitors.
Here's how it will work:
1. Sign up for the challenge in our Forum (you must register first), with a link to your blog. You have until October 7th to sign up. (If you don't have a blog yet, but want to start one and join the challenge, that's fine, as long as you get the link to us by the 14th.)
2. Everyone who signed up will have 1 week, from October 7th to October 14th to spruce up her blog. Some ideas might include a new header, a new background, frequent postings with interesting content, cleaning up your page elements, maybe adding some blinkies, (links to AC Bailey will score some points ) The idea is to make your blog represent you and your style. The Design team will post a few links to tips and tutorials for blogs during this time.
3. From October 14th through the 17th, the design team will visit all the blogs entered in the contest. We will be looking at overall design, uniqueness, and blog content.
4. Three winning blogs will be awarded a prize from AC Bailey Designs and will be chosen to participate along with the Design Team in a Blog Hop in mid November!
Can't wait to look at all the cool blogs! Good luck!!
Here's how it will work:
1. Sign up for the challenge in our Forum (you must register first), with a link to your blog. You have until October 7th to sign up. (If you don't have a blog yet, but want to start one and join the challenge, that's fine, as long as you get the link to us by the 14th.)
2. Everyone who signed up will have 1 week, from October 7th to October 14th to spruce up her blog. Some ideas might include a new header, a new background, frequent postings with interesting content, cleaning up your page elements, maybe adding some blinkies, (links to AC Bailey will score some points
3. From October 14th through the 17th, the design team will visit all the blogs entered in the contest. We will be looking at overall design, uniqueness, and blog content.
4. Three winning blogs will be awarded a prize from AC Bailey Designs and will be chosen to participate along with the Design Team in a Blog Hop in mid November!
Can't wait to look at all the cool blogs! Good luck!!
Did you know that THIS Saturday October 3rd is World Card Making Day???
Yes, and I researched the history-
It began in 2006 as National Card Making Day. Founded by Paper Crafts magazine to bring card makers together at the beginning of the busiest card-making season of the year, it was first held on October 7, 2006. The initial celebration involved the Paper Crafts magazine audience only; however, due to the positive response it received and the worldwide popularity of card making, the holiday became known as World Card Making Day from then on. It is now in its fourth year, World Card Making Day is celebrated annually on the first Saturday in October. It's a day for the card-making community -- hobbyists, retailers, and manufacturers -- to unite and celebrate the connection and creativity that is the heart of card making. So, I went to the Papercrafts site and found this!
World Card Making Day is a holiday especially for card makers around the world to Celebrate the creativity of handmade cards and the personal connection that they create between friends and family as well as to kick off (and get a head start on) the holiday card-making season. How many of YOU have already started your Christmas cards???
We here at AC Bailey want IN on the festivities, too! So, we will have another weekend contest here at the AC Bailey forum to celebrate the art of card making!
Join your ACB Design Team and special guests TONIGHT for challenges, a contest, and some learning...as only they can do! And of course, we will have PRIZES!!!
Get ready for some more fun ladies- it is coming your way!
All official posts to be launched Friday evening in the Forum - be here you will not want to miss this!
Gail
Freaky Friday Challenge 10/2/2009

I just love fancy edges - they really make such a wonderful difference when layering papers....Bazzill makes some wonderful ones already cut, like this week's product of the week - and there are some gorgeous border punches out there by Fiskars and EK Success
this Freaky Friday challenge is an easy one.....
use at least 2 different border designs on your layout...and you can't use a scallop.....and maybe once the layout is done, you can do the same on a card in honor of World Cardmaking Day!!
and don't forget to post to our gallery to be eligible to win a Gift certificate to our store!
Subscribe to:
Comments (Atom)


