Easy! Make your own on your computer!
Here's all you need to do: (These steps are for MS Word, but I'm sure you can do the same thing in just about any word processing program out there)
1. Open a new document and decide what shape you'd like to be the "frame" of your journaling spot. For this example I'm going to choose brackets. Simply type the open and closed brackets side by side (like this { }).
2. Now you're going to increase the size to what you would like. Click and highlight the brackets, and change the font size. You can go as large as you like, simply click in the window which shows the number to type in a higher number. I chose a font size of 150 for mine.
3. Next, decide how much space you'd like within the frame. I clicked in between the brackets and hit the space bar about five times to get the width I wanted.
4. The final step is too add the lines. Open your program's drawing tool bar (go to "View", "Toolbars", and be sure the "Drawing" tool bar has a check mark next to it). From that toolbar select the "line" tool (it looks like a diagonal line), and little cross-hairs will appear. Draw your lines by clicking within your frame and dragging the line until it's the length you like. Repeat doing that until you have as many lines as you wish.
Then print, cut out, and you're done! (Don't forget you can change the font colors if you like too!)
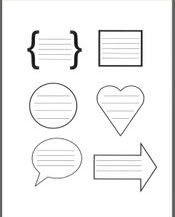
You can also create journaling spots by using any of the other shapes on the "Drawing" tool bar (such as a square, circle, heart, or arrow) and come up with some really cute options! After you draw your shape, you can double click on the outline of it to change the style and thickness. Then repeat the steps above for adding the lines.
Here's an example of the few I put together in a snap! For a clearer image and even the ability to print these for your use, just click here! :)
I hope you enjoy this little trick for the next time you need just the right journaling spot. If you have any questions on this, please don't hesitate to pop on over to our community forum and say hello! Have a wonderful October!
All the best,
Jess


These are really great Jess!
ReplyDeleteThis is great. Thanks so much for sharing.
ReplyDeleteThis is so cool! I was needing this the other day. I will try it. TY Jess.
ReplyDeleteConnie